Saturday, January 25, 2014

Bananas and Cream Pancakes

So along with being a vegan this year (and preferably life long), I also want to work my way through my cookbooks. I've had some that I've barely cracked because when I early into this new eating style I was intimidated. Now that I have the basic equipment and understand the lingo I've been more adventurous. One particular book on my shelf: Eat, Drink, & Be Vegan by Dreena Burton is loaded with excellent, tasty, and easy ideas. So this morning I decided to make and slightly modify the 1st recipe in the book. To date these are my favorite pancakes and a new regular addition to my busy morning schedule.


Ingredients
  • 1 1/2 cup spelt flour (or any all purpose flour of your choice)
  • 1 Tbsp. + 1/4 tsp. baking powder
  • 1/2 tsp nutmeg
  • 1/8 tsp. salt
  • 1 can light coconut milk
  • 1 ripe banana
  • 1 Tbsp. raw sugar
  • 1 tsp. vanilla extract
Instructions
  1. In a large bowl sift together flour, baking powder, nutmeg, and salt.
  2. In a blender or food process (I used my Nutribullet because it's super easy to clean) blend until creamy and uniform the coconut milk, banana, sugar, and vanilla
  3. Pour the blended mixture into the dry ingredients and mix until well combined
  4. Lightly grease a griddle and let get hot. 
  5. Pour out 1/4 cup amounts of batter onto griddle
  6. Cook until bubbles start to form and then flip, cook a few minutes more
  7. Serve with your favorite toppings.  

Oat Pumpkin Coconut (Flour) Waffles


Ingredients

Wet
  • 1 cup canned pumpkin puree
  • 1 1/2 cups non-dairy milk (i used coconut)
  • 2 Tbsp. pure maple syrup
  • 2 Tbsp melted coconut oil
  • 2 Tbsp. ground flax seed
Dry
  • 1 1/4 cup oat flour, ground 1st
  • 1/4 cup coconut flour
  • 2 tsp. baking powder
  • 2 tsp. pumpkin pie spice
Instructions
  1. Preheat waffle iron and lightly spray with cooking spray
  2. Combine dry and wet ingredients in separate bowls
  3. Mix all together
  4. Pour in batches based upon waffle iron size
  5. Cook until crisp
  6. Top with what you like

Gluten Free Flour Blends

I have been experimenting with different gluten free flour blends because of various reasons. Mostly because I like the challenge and the different flavors that come from using non-wheat flours.

Here are 2 of the current blends I have made up in my pantry. Each mix yields about 4 cups.

Double Rice Flour Blend
  • 1 cup brown rice flour
  • 1 cup white rice flour
  • 1 cup tapioca starch
  • 1 cup potato starch
  • 2 tsp. xantham gum
Corn-Rice-Sorghum Flour Blend
  • 1 cup brown rice flour
  • 1/2 cup corn flour
  • 1/2 cup sorghum flour
  • 1 cup tapioca starch
  • 1 cup potato starch
  • 2 tsp. xantham gum
Feel free to sub together any different flours you might like. The key thing is to have an equal ratio of flour to starch and to always use a gum in the amounts of 1 tsp. per 2 cup mix.


Baked Peanut Butter Banana Quinoa Oatmeal

Ingredients 

Dry
  • 2 cups rolled oats
  • 1 tsp baking powder
  • 2 Tbsp Peanut flour
  • 1/4 tsp. salt
Wet
  • 1/4 cup applesauce
  • 1 mashed ripe banana
  • 1 1/2 cups non-dairy milk
  • 1 tsp. vanilla
Add-ins
  • 1 cup cooked and cooled quinoa
  • 1/4 cup non-dairy chocolate chips
Instructions
  1. Pre-heat oven to 375 degrees and lightly grease or line an 8.5 x 13 in. casserole dish
  2. In large bowl mix the dry ingredients
  3. In medium bowl mix the wet ingredients
  4. Combine the wet and dry ingredients
  5.   Fold in the quinoa
  6. Pour mixture into dish and top with chocolate chips
  7. Bake for 25 min
  8. Let cool for 5 min and then slice

Coconut Lime Pancakes


Ingredients 

Wet:
  • 1 Flax Egg (1 Tbsp. ground flax seed via coffee grinder mixed with 3 Tbsp water and allowed to sit for a few minutes)
  • 1 cup unsweetened coconut/almond milk blend at room temp.
  • 1 Tbsp freshly squeezed lime juice
  • 1 tsp. lime zest
  • Tbsp melted coconut oil


Dry
  • 1 cup all purpose flour (white unbleached or whole-wheat pastry)
  • 1 tsp. coconut sugar (usually found as organic and raw)
  • 1 tsp. baking powder
  • 1/4 tsp. baking soda
  • 1/4 tsp. salt


  •  1/4 cup shredded unsweetened coconut (to fold in right before pouring)
Instructions
  1. Make the flax egg in a separate bowl by mixing the ground flax seed with water and set aside
  2. In a large bowl sift together all the dry ingredients and make a well in the middle of mixture
  3. In a medium bowl combine all wet ingredients and the flax egg
  4. Pour the wet ingredients into the well. Stir gently until just incorporated. DO NOT OVERMIX
  5. Pour batter in 1/4 cup measurements onto a hot and lightly greased pan or griddle
  6. Cook until bubbles start forming in the middle of the pancake, then flip and cook about 3 minutes on the other side
  7. When done top with what you like. Enjoy


To stick with the tropical theme I topped mine with sliced bananas, shredded coconut, and some maple syrup

Monday, January 20, 2014

Complete Wheat Pancakes

So we all know that implementing fiber into our diets is essentially for a healthy GI tract. Fiber is properly known as cellulose, the insoluble carbohydrate found in plant cell walls. We as humans, and most mammals for that matter, are unable to digest this little guy. However, this makes it excellent in our foods. Fiber makes you feel fuller so you eat less and it adds bulk which makes things move through smoother. The only down side is the added flatulence you may experience. This is much more likely if fiber is something you're newly increasing in your everyday scheme. You see, we all have lots of little microbes in our gut to help us digest. These bacteria have the proper enzymes in their cell walls to break down cellulose and as a result they release nitrogen gas, which is translated as a FART to the human world. Furthermore, we have billions of these guys living in our body at any given moment. So when they go at a new found smorgasbord of cellulose they go a little over the top and cause more gas than you may like....

But if you start to eat plenty of fiber daily this affect will begin to wear off and you will poot more normally... Not sure how to put it any nicer.

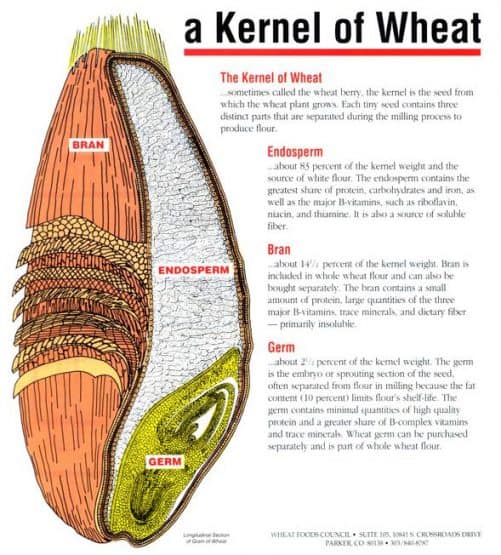
On that note, I've been trying more and more ways to incorporate fiber into my family's diet in yummy and creative ways. My 1st goal was to do something with wheat. We all use it (save those that are Gluten-intolerant for obvious reasons) and I did a little research. The flour that we commonly use in our meals is actually only the milled 1/3 part of wheat. The wheat berry (the pretty little round things you see growing off a wheat stalk in the field) is composed of 3 parts: the germ, the bran, and the endosperm. For most flours the endosperm is the only part ground up. What happens is much of the fiber and nutrient dense part of wheat is thrown out. This is true for many other grains such as oats, because we typically only eat 1/3 of those little guys as well.
On different trips to the grocery store I purchased some wheat germ, its in the fridge at the health food store and I also got some wheat bran, on the shelf this time. The germ tends to go rancid if its not kept cold. Now I have plenty of wheat flour in my home: whole wheat pastry, white whole wheat, stone ground whole wheat, and unbleached enriched white wheat. None of these are truly "whole" because again they are only the endosperm. Now my meals started turning and I wanted to create a mixture of all 3 and see what taste I came up with. Boy am I glad I did.

Oddly enough I could find a recipe anywhere online that used all three, in fact if a bran was used with the flour and wheat germ it was almost always oat bran. So I finagled (spelling) and few ideas together and came up with my own concoction. Zacchaeus gobbled these pancakes down, something he almost never does before for finishing his oranges first. Made me smile a bit.
Feel free to also experiment with this recipe, but I promise it is wonderful, nutty, and delicious as is.
Ingredients:                            Makes 5 pancakes

Dry
  • 1/2 cup white whole wheat flour
  • 1/2 cup wheat bran
  • 1/2 cup wheat germ
  •  2 tsp. baking powder
  • 1 heaping Tbsp. brown sugar
Wet
  • 1 Flax Egg (1 Tbsp. ground flax seed (or flax meal that is already ground) + 3 Tbs. water)
  • 1 cup non-dairy milk, unsweetened
  • 1 Tbsp. unsweetened applesauce (this replaces oil but you can sub it in if you're not worried about the added fat)
  • 1 Tbsp. pure maple syrup
  • 1 tsp. vanilla extract
 Instructions
  1. Mix dry ingredients in a large bowl
  2. Make flax egg (I use my cheap and awesome coffee grinder to break mine down)
  3. Mix all wet ingredients together in a smaller bowl
  4. Pour the wet ingredients into the dry and mix until just combined
  5. Heat a skillet or griddle and lightly grease
  6. Pour 1/3 cup of batter onto the griddle about 2 inches apart and push down slightly with cup
  7. Heat about 2 minutes on one side til you see bubbles in the center
  8. Flip and heat about 2-3 minutes on the other side
  9. Plate and top with what you like
  10. Enjoy!
I decided to not use syrup this morning. Instead I put a little Strawberry jam, Almond Greek-style yogurt, pomengranate seeds, and golden raisins on mine. It was so yummy and filled me way up plus gave me lots of energy this morning.


Sunday, January 19, 2014

Feel Better Sweet Potato, Barley, and Greens Soup

I've had a bit of a cold the last couple days and I've also had some sweet potatoes staring at me begging to be used. So I decided at 4 am today when I was up nursing Franklynn to look up on my phone's internet a soup recipe. There are tons of recipes out there and I always want to modify what I find and make it my own based on what I have on hand. So today for lunch I made this awesome soup that melts in your mouth, smells amazing, and made me feel a bit better.

I don't like to miss church but I did not want to go and get anyone else sick. Franklynn stayed home with me since he's still primarily nursing, but Jordan and Zaccheaus went and came home to tell me about the beautiful sermon and all those who were praying for me. I love my church.

The best part is that this soup came together quickly and was ready right when the fellas walked in the door at noon. I always like how timing seems to work out.

 Ingredients
  1. 4 small (or 2 medium sweet potatoes) peeled and diced
  2. 1 red onion, peeled and chopped
  3. 2 cups chopped greens (your choice but mine was a mix)
  4. 1 cup pearled barley
  5. 7 cups vegetable broth
  6. 1 can chickpeas, drained and rinsed
  7. 2 Tb. red curry paste (I use Thai kitchen)
  8. 1/2 tsp. sea salt
  9. 1/4 tsp. white pepper
  10. 2 Tb. olive oil (optional)
 Instructions
  1. Line a pot with oil (or water if you want to go fat-free) and add the onion and sweet potato
  2. Cook over medium-high heat until the onion starts to soften, about 5 minutes
  3. Add in the curry paste and coat the onions and potatoes, then stir and cook for about 2 more minutes
  4. Pour in the barley, broth, salt, and pepper. Bring to boil
  5. Once boiling stir, reduce heat to simmer, cover and cook for about 25 min.
  6. Add in the greens and chickpeas. Cover and cook for an additional 15 minutes
  7. Turn off heat, serve, and Enjoy!


 I served mine with a few slices of lightly toasted whole grain vegan friendly flatbread


Low-Fat Peanut Butter Chocolate Green Smoothie

I recently made an appliance purchase that I could not have been happier about, the Nutribullet. This little wonder is fairly inexpensive (especially since I had Christmas gift cards). I bet I use it 5 or more times a week. It's especially great when I don't have to pull out my bigger and harder to clean food processor...also I great tool that I use often.

When it comes to smoothies, the Nutribullet can't be beat. Plus it makes the product as uniform as a juice blend but I don't waste any pulp, ergo, I don't lose any fiber. I do still love my Breville juicer, but I always cringe when I put close to a pound of pulp down the disposal and am left with maybe 8 oz. of juice. But anyway back to my point.... Green smoothies. I've experimented with many types and consistently find that spinach is the only green that doesn't over power the sweetness I aim to include.

Plus I've had a bit of a cold today and yesterday which is making me somewhat dizzy and lethargic. So I figured every meal I had today would be super charged with nutrition.


Ingredients
  • 1 handful or two baby spinach
  • 2 Tb. peanut flour (you could use 1 Tb. natural smooth Peanut butter, but this would make it higher in fat)
  • 1 Tb. cocoa powder
  • 1 frozen banana, broke into a couple smaller pieces
  • 1 cup unsweetened almond/coconut blend milk
Instructions
  1.   Add all ingredients to the large bullet cup and screw on the extractor attachment
  2. Run the bullet for about 10 seconds
  3. Put on the handle attachment
  4. Enjoy!

Overnight Marmalade French Toast

This is one of my oldie yet goodie favorite go-to breakfasts. It works especially well when I have leftover ciabatta or french bread that is stale and sitting in my fridge. I don't particularly like to throw away groceries because it's like throwing money down the drain. So when there is a way to use up the scraps in a new delicious way it's always a win. This is another great recipe from Lindsay Nixon if you haven't already bought her books or checked out the website, all I can say is what are you waiting for!


Ingredients
  • 2 square multi-grain Ciabatta buns ( I get mine from Sam's club, they're freshly baked and vegan friendly) 
  • 3/4 cup unsweetened almond milk (but any non-dairy milk will work)
  • 2 Tbsp. chickpea flour (this little wonder is what provides the "egg-like" texture and taste)
  • 1 tsp. ground cinnamon
  • 1/4 tsp. sea salt
  • 1/4 cup orange marmalade (pay close attention to the label and get one that does not contain high fructose corn syrup.... in other words, avoid the really cheap ones)
  • Any topping of your choice, this morning I used pomengranate seeds, bananas, golden raisins, powdered sugar, slivered blanched almonds, and little maple syrup
Instructions
  1. Slice the buns diagonally into 1/2 strips.
  2. Lay the slices into a lightly greased 13x9 casserole dish
  3. In a medium bowl whisk together the milk, flour, cinnamon, salt and marmalade until fairly uniform
  4. Pour the mixture over the top of the bread aiming to have a consisent coating on all pieces
  5. Cover dish with saran wrap and place in fridge overnight
  6. In the morning, remove saran wrap and place in a 350 degree preheated oven for about 20 minutes
  7. Plate according to desired serving size and top with your own liking
  8. Enjoy!

Saturday, January 18, 2014

Banana Cupcakes with Peanut Butter Frosting

I am a huge fan of the show Cupcake Wars. Seriously, it is a bit of an obsession. We don't have cable at my house, but whenever I visit my folks or my in-laws I make sure to watch the episodes or I catch up online. I love how creative these bakers can be and it inspires me to get more creative. A couple years ago the 1st ever Vegan chef appeared on the show, Chloe Coscarelli. While up against 4 other professional pastry chefs she won by a landslide because he flavors were incredible. Can you guess why? Because she uses all natural plant-based products and even the pickiest palate can distinguish real food from the processed stuff.
After deciding to get back in the swing of my Vegan lifestyle the other day I started looking for cookbooks that made going Vegan easy. When I saw that Ms. Coscarelli had her own cookbook out I was elated and bought it right away.
http://www.amazon.com/Chloes-Kitchen-Delicious-Recipes-Making/dp/1451636741/ref=sr_1_1?s=books&ie=UTF8&qid=1390105530&sr=1-1&keywords=chloe%27s+kitchen

Now while I'm still a number 1 fan of Lindsay Nixon and her low-fat Vegan recipes for my optimum health, Chloe's use of unprocessed plant oils adds a little something to her food, especially her desserts. I will be adding many recipes to this blog as I make them. Everything I've made so far I've quite enjoyed. Plus, her awesome instructions taught me how to finally press Tofu and I love it now.

When I found out that my dear friend Trish from church had a birthday coming up, I knew I had to make one of Chloe's award-winning cupcakes. I wanted to bring the best dessert possible with the healthiest ingredients I could. I made the Banana cupcakes from the book with a little modification. I used virgin coconut oil in place of the vegan shortening. Also, rather than using the lemon icing from the book I chose to make some peanut butter frosting. You will find both my recipes below. These were amazing. Trish loved them as did many others that of course are very skeptical of vegan food.


Ingredients

Banana Cupcakes
2 cups all purpose flour (I used unbleached enriched white flour, but any should work)
1 cup organic and/or raw sugar
1tsp. baking powder
1-2 tsp. baking soda
1 tsp. salt
1/2 tsp. ground cinnamon
1/2 tsp. ground nutmeg
1/2 tsp. ground cloves
1/2 tsp. ground ginger
1 cup mashed ripe bananas
1 cup canned lite coconut milk
1/2 cup melted coconut oil
2 tsp. apple cider vinegar
1 Tb. pure Vanilla extract

Peanut Butter Frosting
2 cups organic powdered sugar, sifted before putting into mixture
1/2 cup virgin coconut oil
1 cup smooth all natural peanut butter
5 Tbs. vanilla almond milk (this you can adjust based on your consistency preference)

Instructions
1. Preheat oven to 350 degrees. Line 2 cupcake pans with 18 paper liners
2. In a large bowl mix together all dry ingredients
3. In a separate smaller bowl combine banana and wet ingredients
4. Pour the wet mixture into the dry mixture and mix until just incorporated, don't overmix or it will lose it's fluffiness
5. Fill the cupcake liners 3/4 of the way full
6. Bake for 18 to 20 minutes until a toothpick comes out clean in the center of the cupcake
7. Cool on a cooling rack completely before adding the frosting.

8. In a medium size bowl with an electic hand mixer or in stand mixer, combine all frosting ingredients.
9. Whisk until uniform
10. Place frosting into a piping bag and add frosting in design of your liking to the top of the cupcakes. I had lots of leftover frosting.... it makes an excellent toast spread or waffle syrup drizzle

Now serve this to any willing party, they will love you forever and beg for the recipe.


A day with the family

Despite having a wretched cold and/or severe allergies today, I managed to have a great day with my guys. I actually woke up before both the kids and managed to create a yummy new recipe, coconut lime pancakes.
 After a yummy breakfast Zacchaeus got to play outside with his daddy and the neighbor kids while Franklynn and I did some stuff indoors.
 And then we drove down to Gainesville to meet the in-laws at the park play with both kiddos. Both kids had a blast.


And then we went to a local Texas restaurant, Fuzzy's Taco. I've never been but hoped they offered something I could eat as a Vegan. And yes they did. I got a roasted vegetable quesadilla with warm guacamole filling in place of cheese. And of course we had chips and salsa, black beans, and rice. What a yummy filling dinner. Plus little Franklynn was so incredibly awesome today. He is getting easier and easier to take places. It makes this mommy ecstatic.


Decadent Low-Fat Brownies

So I'm always looking for low fat but yummy desserts that I can easily make with stuff I have at home. While using special ingredients makes for interesting experiments in the kitchen, it's just not always practical. Plus, now that I live in Sherman none of the stores, including the health food store, carry the the same selection of organic and natural food products I'm used to from living in Denton. In fact, I always have a shopping list when I go down to visit my in-laws so I can purchase specific items that I like to use in my meals. 

I recently purchased Lindsay Nixon's new cookbook: Happy Herbivore: Light and Lean. All of the recipes in addition to being low-fat and fat-free as always are now also low calorie with specific measurements including Weight Watchers points, if you're doing that sort of thing. From her blog, Happyherbivore.com, she has made some famous black bean brownies... which I like. However, I wanted to try her new rendition of brownies that taste a little more traditional. Boy were these AMAZING!!!! If I hadn't made the recipe myself, by taste alone you would never have known that Tofu was the 1st ingredient. But boy does this little soy curd gem do the trick. Hands down these are the most delicious, moist, and decadent brownies I've ever eaten. And I've had many a brownie in my lifetime. I hope you're willing to venture out of your comfort zone a bit and give your taste buds and waistline an experience they will continue to thank you for.

Ingredients:                         Serves 9
1 package shelf stable 14-oz extra firm tofu
3 Tb. vanilla almond milk, divided
1/2 tsp. vanilla extract
1 Tb. balsamic vinegar
1/4 cup agave nectar
3/4 cup white whole-wheat flour
1 tsp. baking soda
6 Tb. unsweetened cocoa
2 Tb. brown sugar
3/4 cup vegan (non-dairy like Ghiradelli semi-sweet) chocolate chips

Instructions
1. Preheat oven to 350 degrees
2. Lightly grease (spray) and 8x8 in. baking pan
3. In a food processor or high powered blender combine the drained tofu, 2 tablespoons of almond milk, the vanilla, agave nectar, and the vinegar. Blend until there is a a smooth mixture and no visible chunks
4. In a medium mixing bowl combine the flour, baking soda, cocoa, and sugar together. Mix well.
5. Pour the blender mixture into the dry ingredients and add the remaining tablespoon of mix. The mixture should be shiny in appearance. Fold in the chocolate chips and pour into the baking pan.
6. Smooth out the batter to be nearly even in pan and put in oven
7. Bake in oven for 15-20 minutes until set. You don't want to over bake. The brownie will firm up as it sets.
8. Let cool and then slice and serve

I topped mine with Greek style plain almond yogurt. This was so delicious and Zacchaeus kept saying yum, yum.

Check out the awesome new cookbook here. It's a new staple in my kitchen.
 http://www.amazon.com/Happy-Herbivore-Light-Lean-Low-Calorie/dp/1937856976/ref=sr_1_1?ie=UTF8&qid=1390077585&sr=8-1&keywords=happy+herbivore+light+and+lean

Friday, January 17, 2014

Mexican Polenta Pizza

I'm always looking for ways to incorporate new types of pizza into my life. After all, pizza is my favorite food and it's so easy for a toddler to eat!


Ingredients

Crust
2 1/2 cups water
2 tsp. taco seasoning (make sure it's dairy free)
3/4 cup coarse ground cornmeal, grits, or polenta

Sauce
1 cup vegetarian fat free refried beans
2 Tb. vegan sour cream
2 Tb. hot picante sauce
1/4 cup canned diced tomatoes

Topping
1/2 cup lentil taco meat * (optional, can sub with black beans)
1/2 diced zucchini
1/4 cup diced red onion
1/4 cup diced bell pepper
1/2 cup sliced black olives
1/4 cup vegan cheddar shreds
1 handful crushed tortilla strips

Lentil Taco Meat
1 cup cooked lentils
2 tsp. taco seasoning
1 Tb. ketchup (make sure there is no high fructose corn syrup)
1 tsp. mustard
1 tsp. low sodium soy sauce

Instuctions
Make crust
1. Bring water to boil with taco seasoning
2. Slowly add in polenta while whisking and continue to whisk in boiling water for 5 minutes until thick and creamy
3. Spread mixture evenly into a parchment paper lined rectangle cake pan
4. Let cool at room temperature for 5 minutes and then place in freezer for 20 minutes to cool and set (30 if you prefer the fridge over the freezer)

Make Lentil Taco "Meat"
1. While the crust is cooling cook lentils. Mix 1/2 cups dry rinsed lentils with 1 cup warm water and allow to simmer in a covered pot for about 15 minutes until lentils are tender.
2. Transfer to a food processor or blender and pulse to desired consistency
3. Place in a bowl and toss with other "meat" ingredients. Set aside

Make Sauce
1. While the lentils are cooking, place all sauce ingredients in a food processor and blend together.
2. Pour into a bowl and set aside.

Bring it all together
1. Preheat oven to 350 degrees
2. Slide crust and parchment paper out of cake pan and onto a cookie sheet, bake for 30 minutes
3. Remove the crust from oven and spread sauce on top evenly ( you will definitely have leftover sauce, use it as bean tip or in a bean enchilada later)
4. Top with remaining toppings and bake for another 15-20 minutes
5. Once out of oven immediately slide the paper and pizza onto a cookie sheet otherwise it builds up moisture underneath and gets soggy
6. Slice and enjoy!

Note: this is a very soft crust, it will not taste like the normal pizza dough you are probably used to. Also feel free to experiment with sauces, toppings, and spices!